Showing posts with label Guest Blog. Show all posts

Friday, August 22, 2014

Guest Blog Post on Some Fun Road Trips

I am in denial that summer is over. There is still some fun weekends and Labor day weekend to squeeze in some fun adventures. If you want to plan something fun for your family, then today's guest blog post is perfect. Whitney has some fun places to visit all within a 6 hour drive of Salt Lake City.
3 Fun Summer Road Trips You Most Likely Haven’t Enjoyed Yet
Author: Whitney Hollingshead
Utah is home to some pretty incredible natural and manmade attractions. If Utah is also home to your family, you don’t have to venture far to find adventure. This year, however, you may want to consider venturing out into some of the nearby states to explore some unchartered territory. Here are three great family friendly destinations that may be new to your family. All three locations are within a six hour car drive from Salt Lake City.

Destination: Bruneau Dunes State Park, Idaho
Hours from Salt Lake City: 5
What to Do:
Sandboard on the Dunes - bring along your snowsled or rent a sandboard from the visitor’s center at the park. You can also hike on and around the dunes and play in the sand. Keep in mind that the sand will most likely be hot on a hot summer day so plan accordingly. Everyone will be covered in sand afterward, so have a plan to deal with the sand.
Star Gaze at the Observatory - special events at the public observatory in the park offer some great star gazing opportunities. Check out the park events schedule and check the weather forecast.
Camp in the State Park - plan to stay the night and pitch your tent. Your family can enjoy fishing, swimming, hiking, and bird watching. Bring along some kites and make the most of the Idaho wind!
Road Trip Tip: The drive through northern Utah and southern Idaho has little to hold the attention of children. Pack some extra car games, activities, fun music, and even audio books to keep the whole family relaxed and entertained.

Destination: Glenwood Springs, Colorado
Hours from Salt Lake City: 6
What to Visit:
Glenwood Caverns Adventure Park - ride up the mountain on the gondola tram. Get your heart racing on one of the thrill rides like the Cliffhanger roller coaster. Take in a 4D movie experience with moving seats and challenge the family to a game of laser tag. You should also check out the cave tours included in some of the ticket packages.
Hanging Lake - take the short, steep, hike beginning in Glenwood Canyon. Hanging Lake was formed by glaciers suspended at the edge of the canyon. This lake boasts stunning waterfalls, a lake full of trout, and crystal clear water.
Glenwood Hot Springs Pool - visit the world’s largest hot springs pool. You can swim in the warm mineral water pool the length of a football field. The kids can enjoy the kiddie pool and two waterslides.
Road Trip Tip: Pack a separate bag to stay in the car at all times. Keep an extra simple change of clothes for each family member, wet wipes, hand sanitizer, sunscreen, and a first aid kit. This will help you be ready for the unexpected while you are out having fun. You should also consider stocking up on simple snacks to eat in the car. Doing so will save you time and money when you need to stop for gasoline.

Destination: Thermopolis, Wyoming
Hours from Salt Lake City: 6
What to Visit:
Wyoming Dinosaur Center - visit the dinosaur museum showcasing over 30 mounted dinosaurs, hundreds of displays and dioramas, and a modern preparation laboratory. You can also tour nearby dig sites and see actual excavation of real dinosaur bones from the ground. Special programs are also offered that allow you and your kids to participate in real fossil digs! These special programs do require signing up in advance.
Star Plunge Pool Complex - Thermopolis is home to the Hot Springs State Park. These hot springs are used to heat the local swimming pools. Take the plunge into one of the indoor or outdoor pools. Test out your tricks on the diving board or head down one of the three fast-paced water slides. The adults can relax in an adults-only sauna and there is also a separate kiddie pool.
Legend Rock Petroglyph Site - Hike to one of the most impressive petroglyph areas in the world. In order to visit the site, you must first obtain a key form the Thermopolis-Hot Springs Chamber of Commerce in Thermopolis.
Road Trip Tip: Make sure your car is in great condition for your trip. Take care of any needed tune ups or repairs. You may want to consider having your tires checked and rotated before you head out as well. If you have been planning to buy a new car for your family, buying one before your big trip might be the perfect time to make the purchase. Be sure to check out online specials from local dealers to see if you can find what you are looking for and stay on budget.
Summer is the perfect time for exploring. Plenty of time is still available to enjoy a short trip to one of these fun destinations. So clear your calendar, pack the car, and take your family on a summer trip they’ll remember forever.

Tuesday, April 1, 2014

Guest Post on Family Friendly Projects

With spring break around the corner I was wanting some new, fun and fresh ideas to keep the kids and family entertained. Luckily Mary Kremer is our gust writer today to give us some fun ways to keep our family busy. That's the key right? To not let them get too bored, otherwise it's usually Trouble (that's right, with a capital T ;) Mary   Kremer  loves traveling, writing, and learning. In here spare time, she enjoys bugging her husband with everything that's on her mind just as he's about to sleep.


As a proud aunt, I’ve been trying lately to come up with unique and fun activities I can try with 

my nieces and nephews. I see it as “parent training.” Plus, I love being their favorite. This year, 

I came up with a couple different options that I thought would be really fun to try out (and share 

with all of you). Here are a few potential ideas for you to try out as the weather gets nicer.


Paper Airplane Contest

This one was one of my favorites because, not only was it super easy to plan, but my nieces 

and nephews really loved it. All you need is paper, and a few different models of airplanes to 

try out. I googled some instructions for different paper airplanes so that I could try putting them 

together with the older kids. When we had put them together, we went to a nearby park and had 

a little contest. All you need here is some tape to mark the distance each plane goes. Or, you 

can make several markers and see who can get past the furthest one. 

I also thought it would be fun to make some giant airplanes from poster paper...Oh yeah. You 

better believe they loved that one. If you want to get even more creative, you can let your little 

ones color their airplanes before starting, so each one is personalized. You might also want to 

break up your contests by age, if you have a large age range.


Foam Swords

This one was my husband’s idea (I wasn't surprised), but it was actually quite a favorite of 

the kids. Now, you can go all out when it comes to foam swords, and use PVC pipe to make 

handles and everything, but all we ended up doing what giving everyone a foam noodle and a 

cardboard cutout for a sword. The results were fantastic. If you want to step it up, take everyone 

to a park and divide up into teams. Have everyone pick a fortress and then send them all to war. 

Also, make sure they know not to go for face shots, or you might find out the hard way that kids 

think their faces are indestructible.


Hatch some Chickens

I’ll admit, this one cost a lot more than the other activities, but it was SO FUN! And everyone 

had a blast. What you’ll need to do this project is an incubator and some eggs. You can buy 

larger incubators, or you can do what we did and get a really small one that works for 2-3 

chicken eggs. We found one of those on Ebay for $30, and we bought the chicken eggs for 

about $4 each. 

This activity was also a bit longer than our other ones (say, oh, three weeks, instead of an 

afternoon), but I can’t tell you how much fun it was. Our nieces and nephews called us at least 

every day for an update, and we even decided to send out photo updates by phone and email 

to their parents every day. Taking care of the eggs was pretty basic. I called a local incubating 

company for tips (shout out to Incubator Warehouse for all their help), and was surprised out 

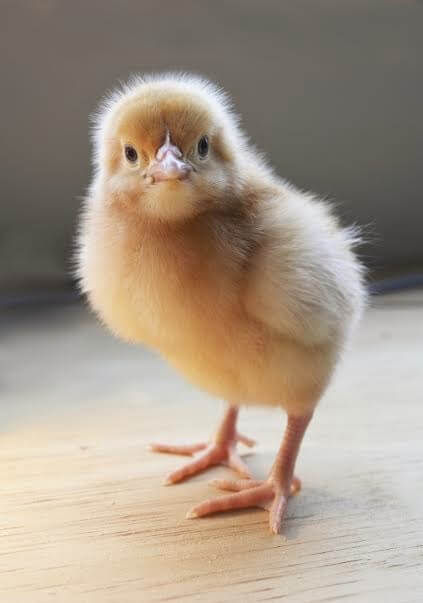
how simple the whole process was. And, as adorable as it was watching those fluffy little chicks 

come out, it was nothing to the faces of those adorable kids.

 I think I’d like to try this activity in conjunction with Easter, as it seems like there are a 

lot of great parallels to draw. Either way, it was a great activity to try at any time of the year, and 

one we’ll definitely repeat.


Thanks Mary for those fun idea's. I have actually wanted chickens my self. Hopefully soon we will finish our fence so I can get some. 

Wednesday, August 14, 2013

A"maze" ing post

I wrote this guest post for Mommy & Me Creations way back in March. I loved it so much I thought it would be fun to share for today's Wacky Wednesday.


I know I can't be the only one out there with hyper active children. I have had several discussions with other moms on how they have some kids that can just play happily by themselves and how other kids need constant entertainment. I needed something to do that would get both those children to get along together. So I sent my 7 year son to get all his Lego's and my 4 year old daughter to get the marbles out of marble works.
I love things that keep them quiet and cooperative while challenging them at the same time. This was perfect for just that. I gave my 2 oldest kids a Lego sheet and told them to make a maze. Although they ended up making one together, and I was very happy to see how well they cooperated. I ended up making the other one with my 2 year old "helper." We then would periodically switch to test each others out.

4yr. old with mom's maze


This was one of my kids's maze creation


My 2 year old trying out my maze
This was fun because with trial and error we could do it so many different fun ways. They got to learn spacial awareness, tactics, communication with the others and so much more! I love that you could make this as intricate or small as you wanted. All my kids enjoyed both parts of making and doing on this as well!
Here is a little video clip of my son doing the mazes.


For other Lego fans out there check out these Lego fun Pinterest links:
Lego City Printable
Lego Kirigami
Lego Math
Lego Sentence Building

Saturday, June 22, 2013

Guest Blog Post- Manicures 101 By Jess

Right now cool nails are very popular. I myself wasn't big into doing my nails till I received some polish from a blog swap. I started wondering where do I even start? Most things I have come across are way over my head, I need a manicures how to for dummies. I asked my long time friend and blogger Jess. She's the blogger behind http://www.yourstrulydear. blogspot.com/.
I am thrilled to write a guest post for Jennifer! I was honored that she even asked me about this topic, as it is a huge hobby of mine (but often goes unnoticed, haha). So hopefully from this post you can get a basic idea of nail care, which will result in a better overall manicure when you do it yourself!
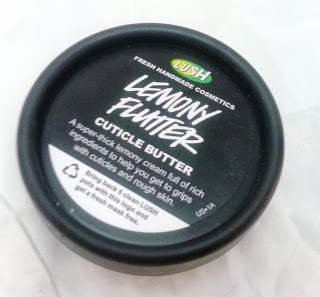
The first essential step of nail care is moisturizing. Especially for your cuticles! Your cuticles do so much work for you as far as protecting your entire nail system [you know, like a respiratory system...except it's everything to do with your nails...ok I totally made that up but I think they should add it to webmd ;)], so you should show them some love. Right now my go to cuticle moisturizer is Lemony Flutter by Lush. While this little jar will last you a while, it's a bit more on the pricey side. Burt's Bee's Lemon Butter Cuticle Cream is another great one, and is more affordable. But even just using a basic lotion or salve and rubbing it into your cuticles will help them out.
Lemony Flutter Cuticle Butter, by Lush
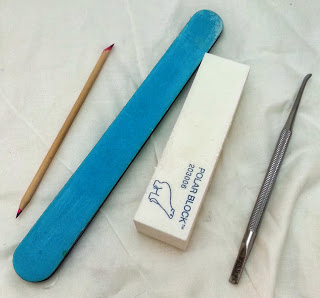
The first thing I do before each manicure is moisturize those cuticles up, and then push them back. I have a metal cuticle pusher, but you can also use an orange stick. These can be found at any grocery/drug store. One thing I've found since furthering my hobby with nail art is that you should NOT cut your cuticles. [Guilty, I totally used to do this]. This actually opens up that protective barrier and makes your nail system susceptible to bacteria/fungus etc. Ain't nobody got time for that! Instead, always push your cuticles back. You can purchase a cuticle remover gel (Sally Hansen makes a great one) to use as a treatment every once in a while to remove buildup too, which is what I do about once a week.
After your cuticles are pushed back, file your nails to your desired shape. File in only one direction along your nail edge. Filing is much better for nail growth than cutting your nails. So if you want those babies to grow and be strong, stick to the file! After filing I use a Polar Block (any nail buffer will do, but the Polar Block is my favorite. It's also only a dollar or less at Sally's Beauty Supply) to smooth the surface of my nails. This helps if you have ridges, peeling, etc. You just want a nice smooth base to paint your nails on.
L to R: cuticle stick, nail file, Polar Block nail buffer, metal cuticle pusher

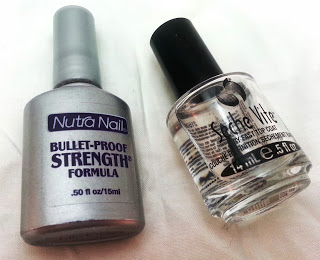
At this point I usually wash and dry my hands, and then you're ready to paint your nails! The first step of painting them is to apply a base coat. This will prevent nail staining from your polish, and will extend the life of your manicure. Right now I use Nutra Nail Bullet-Proof Strength as my base coat. I also really like Beauty Supply base coat (I get mine from Sally's). Your base coat doesn't need to be 100% dry before applying polish, so after I apply it to all my nails then I start with my color.
I always have a cuticle stick (pictured above) by my side whenever I paint my nails. That way if I get any polish on my skin I can use the stick to get it right off before it dries. This makes for much easier cleanup. Apply polish in thin coats. Multiple thin coats are much better and will actually dry faster than one thick, goopy coat. I usually wait about 5 minutes (they're slightly tacky but mostly-ish dry) in between thin coats, until I reach desired opacity. Then I finish it off with a fast-dry top coat. My entire life changed when I found out about fast-dry topcoats. I swear I used to wait HOURS before I felt my nails were dry enough to do virtually anything. Right now I'm using Seche Vite Dry Fast Top Coat. Sally Hansen also makes several varieties if you want something a little bit cheaper. There are several brands of fast dry topcoats though, so feel free to look around.
L: Bulletproof, used as base coat. R: Seche Vite, fast dry topcoat. 
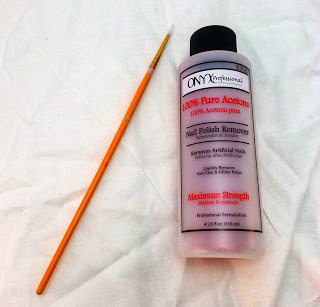
To get that perfectly clean, professional look, I do a bit of cleanup afterwards. I use a small paintbrush and a bottle of acetone, and clean up any mistakes around the nail. It takes hardly any time at all, but will give you a nice polished (hehe) finished look.
I use 100% acetone. It can be drying though, so keep up with your moisturizing!
That's my whole routine for painting my nails. It may seem kind of involved, but once you get the hang of it, it really doesn't take that long. And it will make your manicure look better and last longer. Also, practice definitely makes perfect! Feel free to get creative with your polish, and try new ideas out. I feel like my nails are an expression of creativity, which is why one of my hobbies is nail art. There's lots of inspiration on Instagram (my username is: jesspaintshernails if you're interested), pinterest, blogs, youtube, etc. Happy nail painting!!
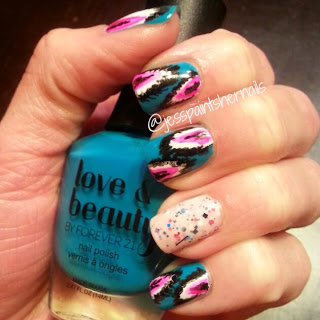
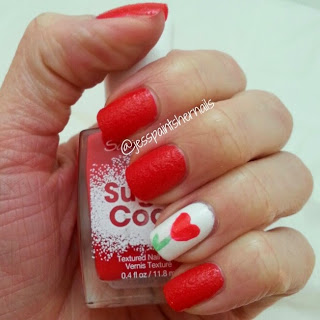
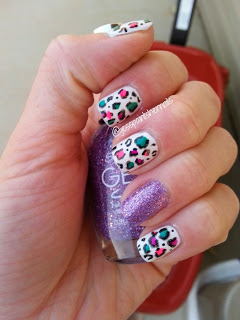
Here are some of my favorite recent designs I've done:
Ikat pattern with a glittery accent nail

used a texture polish for this. i love hearts. 

leopard print is always awesome in my book!

Thanks Jess for that post. I had no idea I shouldn't cut my cuticles, let alone how important and useful they really were. I highly suggest following her on instagram not only because she does some creative things, but she always is re-posting giveaways for nail care lovers.

Thursday, June 20, 2013

Deer Valley Music Festival Tickets Giveaway

I am co-hosting a giveaway sponsored by KBYU 11 for 2 tickets to the Deer Valley Music Festival. My Kids and  I love KBYU 11. They have great shows in the morning that my kids love. Plus I have used their website for coloring pages quite often. Read about what great family services they have to offer and enter to win below:
 

KBYU Eleven, a local Utah television station, is a great resource for parents and all of those who are helping raise a child. KBYU Eleven includes quality educational television programs, a safe online environment, and video parenting workshops. KBYU Eleven has a Kids & Family section that includes activities for children, reading resources, and the schedule for KBYU Eleven's television programming so children won't miss their favorite educational show. There is a Community section with community resources, events, contests, and a quick way to reach out to their volunteer council. Get ahead on your knowledge of future television shows that will be coming to KBYU Eleven by reading about them on their Featured Shows page or learn more about any show you or your children watch.
KBYU Eleven has offered one of our readers two ticket vouchers to go to the Deer Valley Music Festival 2013. Ticket vouchers must be redeemed for actual tickets and expire August 10, 2013. Participants must be at least 18 years old, be a Utah resident, and be able to use the ticket vouchers before August 10. The winner must respond to the winner email within 48 hours or another winner will be chosen. Enter in the form below - personal information is required, however, will not be sold or distributed in any way. This giveaway will end on Friday, June 28, 11:59 pm MDT.
 

Thank you to KBYU Eleven for sponsoring this giveaway. UtahCountyMoms.com is responsible for giveaway delivery but is not responsible for items lost in the mail. This blog was not compensated for this post. Facebook, Twitter, YouTube, and Pinterest do not endorse, nor are they affiliated with this giveaway.
Thank you to Utah County Moms, Enjoy Utah, Keep Moving Forward With Me, and Utah Queen of Chaos for hosting!

Friday, May 24, 2013

Week 1- Strengthen Your Core by, Discover Your Happy

I am way excited to feature today's guest blog post by Discover Your Happy . Discover Your Happy is one of my favorite blogs.  It was started by 3 inspiring mom's. All 3 were very active in High School, College, and still today as they find ways to encourage others. They have healthy recipes , workouts and tips .
We know it is coming up on racing season, summer, etc. so be sure to at least make sure you are doing something to keep your core strength. Core strength is essential to everything we do. When we think core, we normally think abs. However, core is abs, back, glutes, hip flexors...all the central parts of our body that controls so much of our movement. This challenge will help you to continue to strengthen your core!


So we put together an ab/squat challenge. These squats can be done with your own body weight or if you want to give yourself a challenge for all or some of them, pick up some hand weights to add some weight to your squat. It is set up as 6 days on-1 day off. So figure out whatever day you want as your rest day and start accordingly.
 
Day 1: 15 sit-ups, 15 push-ups, 20 sec plank, 50 squats
 
Day 2: 15 sit-ups, 15 push-ups, 30 sec plank, 55 squats
 
Day 3: 15 sit-ups, 15 push-ups, 30 sec plank, 60 squats
 
Day 4: 20 sit-ups, 15 push-ups, 30 sec plank, 70 squats
 
Day 5: 20 sit-ups, 15 push-ups, 35 sec plank, 75 squats
 
Day 6: 22 sit-ups, 17 push-ups, 35 sec plank, 80 squats
 
Day 7: REST
 
Day 8: 25 sit-ups, 17 push-ups, 40 sec plank, 85 squats
 
Day 9: 25 sit-ups, 17 push-ups, 45 sec plank, 95 squats
 
Day 10: 30 sit-ups, 17 push-ups, 45 sec plank, 100 squats
 
Day 11: 30 sit-ups, 17 push-ups, 50 sec plank, 110 squats
 
Day 12: 35 sit-ups, 17 push-ups, 55 sec plank, 120 squats
 
Day 13: 35 sit-ups, 17 push-ups, 55 sec plank, 125 squats
 
Day 14: REST
 
Day 15: 40 sit-ups, 20 push-ups, 1:00 plank, 130 squats
 
Day 16: 40 sit-ups, 20 push-ups, 1:00 plank, 135 squats
 
Day 17: 45 sit-ups, 20 push-ups, 1:10 plank, 140 squats
 
Day 18: 45 sit-ups, 22 push-ups, 1:15 plank, 145 squats
 
Day 19: 50 sit-ups, 22 push-ups, 1:20 plank, 150 squats
 
Day 20: 50 sit-ups, 22 push-ups, 1:25 plank, 155 squats
 
Day 21: REST
 
Day 22: 50 sit-ups, 25 push-ups, 1:30 plank, 160 squats
 
Day 23: 55 sit-ups, 25 push--ups, 1:35 plank, 165 squats
 
Day 24:  60 sit-ups, 25 push-ups, 1:40 plank, 170 squats
 
Day 25: 60 sit-ups, 27 push-ups, 1:45 plank, 175 squats
 
Day 26: 65 sit-ups, 27 push-ups, 1:50 plank, 180 squats
 
Day 27: 70 sit-ups, 30 push-ups, 1:55 plank, 190 squats
 
Day 28: REST
 
Day 29: 70 sit-ups, 30 push-ups, 2:00 plank, 195 squats
 
Day 30 : 75 sit-ups, 30 push-ups, 2:00 plank, 200 squats
 
Doing this each day will take about 5-10 mins. I actually do them most days right before bed. This may not be the best time but I have found what works for me. And what is even better, is most nights my husband will join in with me to work on his core strength as well!!!
 
Doing it every day will help get the results you are looking for!
 
By Discover Your Happy


 Thanks so much for sharing this with us! I love this and am starting today myself. Keep in mind not to strain your lower back. Your abs and lower back have a connected relationship. Your back will "pick up the slack" where your core/abs can't. There's a line between pushing yourself and hurting yourself. The more you do this and strengthen your core, the less work your back will need to do. I am excited to add this to my daily routine. Which will most likely be those only few quiet moments I get alone- in the bathroom.  Yup 10 minutes before hopping in the shower is a great time to do it for me. Thanks again  for the guest post!    **Jennifer**
 

Tuesday, March 26, 2013

Cloth VS Disposable

 I just want to start out by saying this post is about my experimenting and trying out cloth diapers. It is not really meant to debate why one is better than the other. I am by no stretch a cloth diaper expert, as you will learn as you read. Cloth diapers has been in the back of my mind for a while. So after talking to a few friends and reading up on a few websites here is what I personally  have learned, tried, and decided.
So Why did I decide to give cloth diapers a try in the first place? For a few reason actually.
1- Cost. In the long run it is cheaper for me to do cloth diapers. Usually the start up cost can be expensive, however I purchased some previously owned all in ones to start out. I was very fortunate to find a good deal, even though they are boy colors. I figure I average about $8.50 for a package of 42 diapers. Granted sometimes I spend more, sometimes less depending on deals and coupons. That means my average cost comes to $.20 a diaper. It might not seem like a huge savings but long term it will add up.
2-Being prepared. I have had the opportunity to be snowed in before (Read about that here.)That was even when we lived 2 miles from a grocery store. Now that I live 15 miles from the closest store plus with the set up of homes out here this is a  high possibility. I really just want to be prepared if for some reason I don't have immediate access to diapers. That could even simply be because my husband went to work with both sets of keys, because that has NEVER happened!
3- Double duty. I currently have 2 kids in diapers. Adrianna who is almost 2 years old and Graciella who is 4 months old. This adds to the cost point I made earlier. I do think doing cloth on Adrianna she will get potty trained sooner than later. She asks to be changed way sooner in cloth than disposable. Plus Graciella's diapers aren't bad since she isn't on solids yet, so why not now if ever?
Bonus- Environmentally Friendly. This is more of an extra perk than it is one of the selling points for me. Being totally honest this alone wouldn't sell me on cloth, but it is a good benefit none the less.
If you are also weighing pro's and con's here is a link to a more thorough article on why to choose cloth.

I also want to add that I am not doing this full-time. I still do disposable when out running errands, going to church, bedtime and days I am too lazy. Plus I didn't want my husband to stress out so when he changes a diaper he does disposable. I do laundry about 2-3 times a week. Keep in mind I currently only have a total of a dozen all in one diapers, and I only do it 50% of the time. Although the more I do it the more comfortable I am with it.
I know I need more diapers, but I only want one kind of diaper. I did recently buy some off Ebay, but the more I stay home the more I will need. So if you know of any inexpensive places for bumgenius all in one diapers (preferably girl colors this time) let me know.
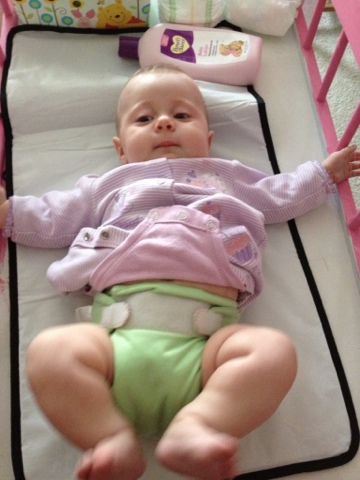
My first cloth diaper change with Graciella.
 
So here is what I think so far. For days like today when it's randomly snowing I don't see why not! I am home with the kids all day, why not save a little? I have discovered I change cloth diapers more often thru out the day.  I also have not had any rash problems yet. I have had a few leaks, but that is not any different than disposable diapers. I actually prefer "newborn blowouts" in the cloth diapers, they don't blow out the top, back and/or sides like in a disposable. Although My 2 year has had a few messy ones I was grateful were in the disposable. The few that haven't been I just flush down the toilet, which doesn't bother me. I read up on a few ways to do wipes and have decided to use a squirt bottle and an old receiving blanket I cut up. So far so good.
 
I was nervous about how to get my husband on board. That's also why I said he can change any diaper right into a disposable. Over time I think he will feel more comfortable using the all in one's, they really aren't that hard. His only fear and request was smell. So for $8 I bought a little garbage can with a lid, noo complaints from him so far.
 
Like I said I am new at this and still figuring it out. I would love advice, tips, thoughts or favorite blogs or websites!


I have been given and found several cloth diapering websites, here are a few of my favorite:
 
The Eco Friendly Family- Cloth Diapers  This link is to their main cloth diaper page, but she has several posts I would recommend reading.
Cloth 101 This website gives descriptions of the kinds of diapers
New to Cloth FAQ Same website as above, different article


Friday, March 22, 2013

A "Maze" Ing

I was so fortunate to be a guest speaker on one of my favorite blogs Mommy & Me Creations.
You can read my post about Lego mazes here: My guest post.
 
We had a lot of fun making and playing with these. See for yourself in this video of my son trying out my maze.